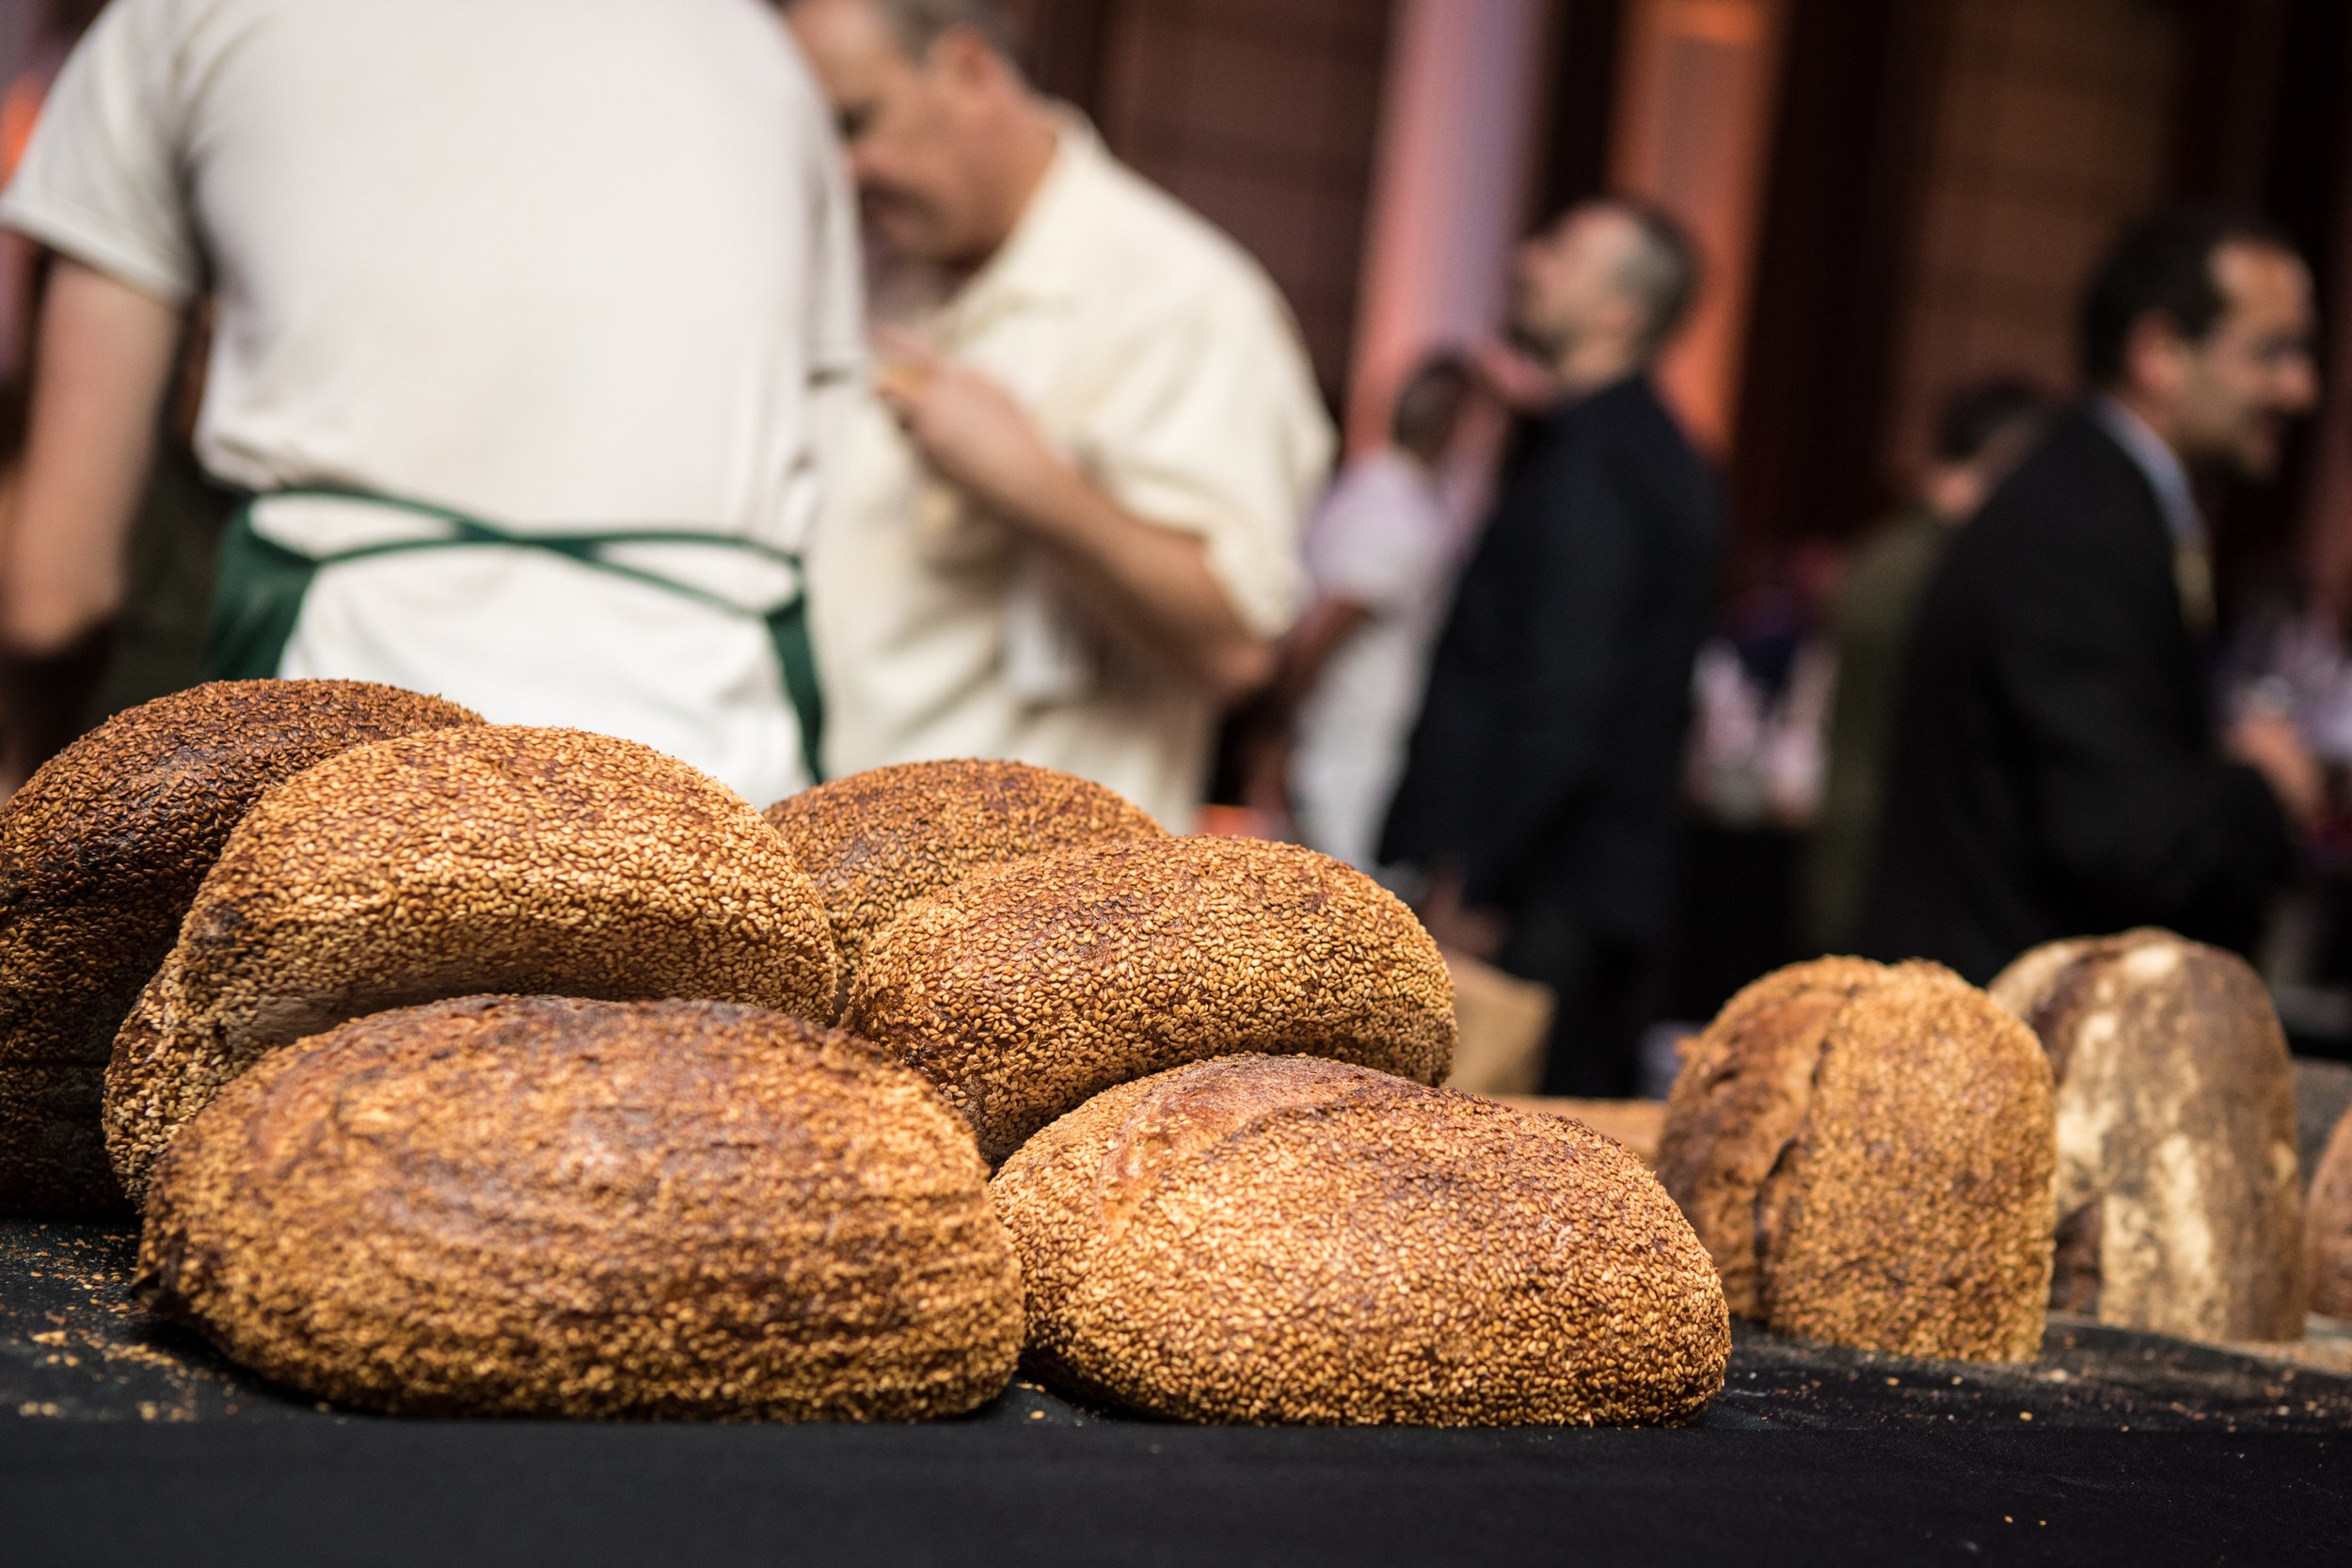
How To Bake Sesame Bread
From baby leaven and jiggly dough to a hollow bottom, Andy Kadin takes us through his bread baking process.
Sesame Bread from Bub' & GRandma’s
Bread baking is hard. If you’re not baking every day—maintaining your leaven, learning the language of the dough, diagnosing issues—you’re going to have a difficult time. It’s all about maintaining stasis—keeping variables as fixed as possible from one day to the next. When things aren’t the way you want them, you can look at what’s changed and adjust.
But when you only bake once a week or once a year, there’s no way to account for what’s changed. You’re just shooting in the dark. So, that said, there’s a target out there somewhere. Let’s lock and load. First off, quit your job. We’re going to be making two 30 percent whole wheat sourdough sesame loaves over the course of the next week.
DAY 1
Place your mason jar on a digital scale, zero-out the weight, and add to jar: 100 grams bread flour, 100 grams whole wheat flour, and 160 grams of filtered 80ºF water. Stir that stuff up to make a uniform paste. There should be no chunks or variability in color. Store the jar with the lid sitting loosely on top in an area with no direct sunlight and a fairly consistent temperature. Temperature is the gas pedal of the whole fermentation process. The higher the temperature, the closer the pedal to the metal. So, regulate temperature throughout this process, or else you’re going to end up deeply depressed with no job because you quit it to make bread this week.
That’s day 1. Don’t congratulate yourself. That would be foolish.
DAY 2
Approximately 24 hours has passed since you stored the jar. Now, remove and discard 75 percent of the mixture, leaving approximately 90 grams of burgeoning leaven.
Now we’re going to feed that baby leaven with some fresh flour so it grows up big and strong. Add 120 grams of 80ºF-water to the leaven. Mix that up, tare your scale, and add 75 grams each bread flour and whole wheat flour. Mix that up.
Repeat this process for the next six (or so) days.
DAY 3-5
The leaven should start looking bubbly and active after day three-ish. You’ll get a nice sour pop to your nose when you remove the loose lid each morning.
DAY 6-8
If this isn’t working, flagellate yourself and start again.
DAY 9
It’s the day before you make the dough. As a solution to the irregularity of your bake schedule, we’re going to get this leaven supercharged. So today before the mix, we’re going to feed it twice. In the morning, we do exactly as we’ve been doing: dumping out 75 percent of the leaven and mixing in 120 grams of 80ºF water, and then adding 75 grams bread flour, 75 grams whole wheat flour, mixing, and storing in your special spot. Before bed tonight, discard 90 percent of your leaven, leaving approximately 35 grams. This next mix is the beginning of the crescendo. Add 80 grams water and mix. Then add 50 grams bread flour and 50 grams whole wheat flour, and mix again. Same deal: loose top, safe place. Take some melatonin to help defeat the excitement and get some sleep.
DAY 10
It’s the morning of the mix! Your leaven should be nice and sour smelling and bubble filled.
Without dumping out any leaven, add 140 grams of 80ºF water and mix. Then add 90 grams bread flour, 90 grams whole wheat flour, and mix. Take note of the time. You’ll return to it in three hours. Loosely cover.
Now we’re going to autolyse your dough. Raymond Calvel, a very French guy, is the originator of the autolyse technique that allows the water for your mix to access the flour before the fermentation begins. It opens up the flour particles to allow easier sugar access for the bacterial bugs in your leaven.
Place a very large mixing bowl on your scale and tare it. Add 875 grams of 80ºF water. Next, add 775 grams bread flour and 325 grams whole wheat flour. Using your hands, carefully mix it together until it is a uniform, somewhat sloppy dough. Cover the bowl with plastic wrap and put it in your special spot to autolyse.
You’ve got three hours. Make some breakfast.
Time to test your leaven. Open the lid and you should be greeted by a sweet, lactic scent, and the leaven should be bubbly. Get yourself a cup of water and scoop off a little bit of leaven. If the little scoop floats, it’s sufficiently populated with CO2 bubbles. If it doesn’t float, wait another 30 minutes and try again.
When the leaven is ready, take 325 grams of it and smear it over the top of your now autolysed dough. Also, weigh out 23 grams of fine sea salt and evenly sprinkle it across the top of your dough.
Using your thumb and pointer finger, scissor through the mixture to integrate leaven and salt. The dough will seem stiff at first and hard to integrate. Rotate the bowl as you scissor through to integrate in different directions. Continue for 5 to10 minutes until uniform integration. Your hands will hurt. You are a doughy marathoner and nothing can stop you.
When the dough is uniformly combined, note the time. This is the beginning of your three-hour bulk fermentation.
There will be four folds during the bulk. The first three are every 20 minutes. The fourth is 45 minutes after that. To fold, wet your hands and grab the far end of dough with the tips of your fingers. Pull straight up to feel tension. Place dough-end on side closest you. Rotate bowl 90-degrees, re-wet your hands, and repeat for total of four sides. Then, take side closest you and roll away from you jelly-roll-style; tuck seam underneath.
Take the temperature of the dough. It should be hovering around 80ºF. If too hot or too cold, shift gears and place your dough in a place where it can return to stasis. Cover with plastic wrap after each fold, as well as every time you set dough aside to come back to temperature.
During the bulk fermentation, the dough needs room to grow. Stretching and folding the dough allows us to increase the extensibility of the gluten strands that are forming inside to build a sort of scaffold support structure that holds our dough up during the bake.
Onward. You’ve done your four folds (20 minutes, 40 minutes, 60 minutes, 105 minutes into the bulk) and you’re getting near your three-hour mark. The dough should be puffy and swollen and should jiggle uniformly when you jiggle it. Go ahead. Jiggle it.
It’s time to divide.
Lightly flour a flat work surface with a mixture of 50 percent bread and 50 percent rice flour, and flip the dough out on to the dusted space. Cut the dough down the center with a bench knife or dough scraper. Flour your scale-top and weigh out two loaves at 1 kilograms each. It’s okay to place pieces of dough on top of the loaf to make it weigh out correctly.
Take the first loaf and flip it onto a dry work surface with no flour. Using your hands in a cupping shape, create surface tension by pulling dough toward you. If it sticks, use a little dusting flour on your hands. Rotate the dough and repeat until surface of loaf is smooth and tight.
Repeat with second loaf. Lightly flour the top of the loaves and cover with dry kitchen towel. Rest dough for 45 minutes. If there are drafts in the area, stop those drafts from drafting.
Forty-five minutes have passed in your life. Flour the crap out of two bannetons. Also, place two half-sheet pans adjacent to your work surface. One should have a uniformly wet kitchen towel on it; the other, an even layer of sesame seeds. Don’t skimp on the seeds.
Remove the towel from your bench-resting loaves and, using a dough scraper, scoop one up and flip it back onto the lightly floured work surface—bottom up.
Lightly arrange the loaf into a circle. Pull the dough up from the far side and place across itself in an envelope fold toward you. Do the same now from the bottom toward the top. Rotate the dough 90 degrees and repeat the folds. Your loaf should now be square-ish.
Take the four corners and fold into center to make a purse. Flip loaf over so all seams are underneath and repeat pre-shape motion to tighten exterior.
Flip into your hand so the smooth, non-seam side of your loaf is facing down. Roll that surface across the wet towel and then through the sesame seeds so they stick. Place the loaf in the banneton with the seam side up, sesame seeds down. Repeat with second loaf. You’re a good baker and a good person.
We’d normally incorporate the sesame seeds into the loaf itself, but it’s your first rodeo. Give me a call later if you want to know how to do sesame inside.
Now you need two large plastic bags. Slide each loafed basket into a plastic bag, remove the air from inside and seal. Place in the fridge until tomorrow to retard the dough. It helps to develop flavor and pace out the fermentation until you’re ready to bake.
DAY 11.
It’s the next day and you’re ready to win back your family and friends with fresh bread.
Turn the oven to 500ºF and place a Dutch oven or, preferably, a cast-iron combo cooker on the middle rack. If you’ve got two—like a crazy person—put them both in there.
When the oven is to temp, lightly flour a 12-inch square of parchment paper with your rice flour-bread flour mixture. Flip a loaf onto your parchment. The sesame side should be up. If it has trouble coming out, feel bad about yourself and delicately use your fingers to disconnect the dough from the walls until it drops.
Take a razor blade (attached to a lame or not) and score an X in quick, decisive ½-inch deep cuts on the top of the loaf. This is not easy so don’t freak out if you’re terrible at it.
Using oven mitts and tons of caution, remove the pre-heated Dutch oven/combo cooker from the oven and place on the stovetop. Remove the lid. Carefully grab the parchment by the corners and lower the loaf into the pot. Place the lid on top and put into the oven. Repeat this step if you’ve got two pots pre-heating.
Bake 20 minutes. Then, try and contain your excitement as you carefully remove the lid. The loaf should be puffed up, and starting to take on some color. Reduce the temperature to 475ºF and bake 20 minutes more, until the loaf is dark and caramelized. Bake longer than you think. Dark is good.
When you’re feeling good about the looks of things, remove the pot from the oven and flip the loaf into your oven mitt-ed hand. Tapping on the bottom should produce a hollow-ish sound. Place the loaf on a cooling rack and listen to it crack and “sing” as the air escapes through your dark and developed crust.
Gather your family and friends to show them your accomplishments and blister silently as their reactions don’t meet your expectations.
Wait until the loaf is completely cooled to cut into it or just do whatever you want.
You won’t wait. No one ever does